Grooming Your Yorkie:
When brushing or combing, be gentle and take your time. Be especially careful when removing mats or tangles. Brushing can and should be a pleasant experience for your pet as the gentle stroking feels good on your pet's skin. It does not take too many painful 'rips' through snarls, however, to make brushing a procedure your pet will try to avoid rather than invite. The best way to build trust and make this a pleasurable bonding time for both of you is to brush your pet often, preferably daily. This prevents problem mats and tangles from developing.
Brush types: Although there are many different shapes and sizes, there are basically three different brush types.
Bristle Brushes: Bristle brushes can be used on all coat types and vary according to the spacing between bristles and the length of the bristles. In general, the longer the hair coat, the more widely spaced and longer the bristles should be. Also, the coarser the hair, the stiffer those bristles need to be.
Wire-Pin Brushes: Wire-pin brushes, with or without rubber-tipped ends, are the preferred choice for pets with medium to long hair and those with curly or woolly coats.
Slicker Brushes: Slicker brushes have fine wire bristles and are especially useful for removing mats and tangles.
Combs: Rubber curry combs are effective at massaging the skin and removing dead hair from short-haired breeds. It is also a good idea to have a Grooming Rake or Mat breaker on hand to remove mats.
Trimming your dog's nails is not just a part of grooming, but is important for your dog's health as well. Untrimmed nails can cause a variety of problems including broken nails that are painful and bleed profusely. In some cases, nails will actually curl and grow back into the dog's feet.
A good indication that dogs' nails are too long is a telltale 'click-click-click' when walking on uncarpeted areas.
How many of us put off trimming our dog's nails until the inevitable veterinary check-up comes around and the veterinarian must do it? If you are like many pet owners, you may be hesitant to trim your dog's nails because you are afraid of cutting the quick of the nail, which may cause pain or bleeding. Once you learn how to do it, clipping your dog's nails is almost as easy as clipping your own.
When you are trimming your dog's nails, you are only cutting away the excess. Recognizing what is excess and where the nerves and blood vessels begin is what you need to know to make nail trimming a painless process for both you and your dog.
To trim your dog's nails:
Trimming your Yorkie’s hair at home
It is also a good idea to keep the area under your Yorkie’s tail trimmed. Long hair in this area tends to get rather icky pretty quickly. How you trim up this part of your Yorkie is up to you and your comfort zone. A lot of people leave this to the groomer. Some people use an electric trimmer or scissors.
7) As far as trimming the hair over the body of your Yorkie, I recommend taking your baby to a professional groomer. If you want to trim your Yorkie’s hair yourself and you feel comfortable, go for it. But, for most pet owners, it is easier to take their Yorkie to the groomer once every month or two as opposed to the stress of clipping the hair themselves. If you decide to trim yourself, there are some great ideas below. You can use scissors or trimmers or a combination. If you use trimmers - remember to always cut with the growth of the hair, not against, or you will have a bald baby on your hands.
As far as when to do which part of the grooming, here is a break-down for you:
Daily:
Brush Hair
Brush Teeth
Weekly:
Bath
Bi-Monthly:
Trim nails
Monthly:
Clean Ears
Trim Ear Hair and Trouble Areas
Every 2 Months, or as needed:
Haircut / Visit the Groomer
Yearly:
Veterinarian Teeth Cleaning
Yorkies need special attention paid to their teeth. Yorkies, like other toy breeds, are prone to tooth decay. Regular brushing of your Yorkie’s teeth is a good idea. There are many tooth cleaning products made for dogs, and you can find a tooth brush &paste at any pet supply store
Preparation of the TopKnot
By Nicoletta Pollini (Italy) Breeder: Qoccle's Yorkshire Terrier.
This article is published in Yorkie Club Magazine. Permission of publication granted by YCM. Images are copyright of YCM.
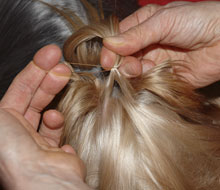
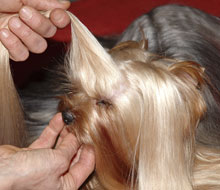
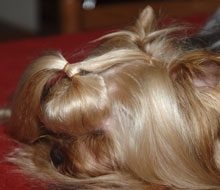
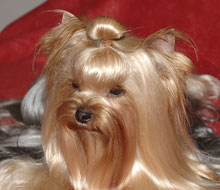
When I prepare the TopKnot, I start gathering two small tufts of hair at the internal base of the ears and tie them up with two small elastics, paying attention the ears do not remain in an unnatural position, that is too close to each other (Pictures 1 & 2). See below....
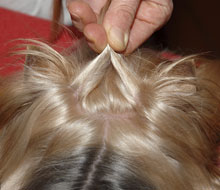
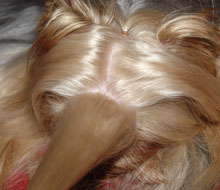
Now I divide a part of hair at the top of the head creating a round shape (Pictures 3 & 4). I let the remaining hair (between the ears and the top knot) fall down at the sides of the head, so that the yorkie's head looks the sweetest possible (Pictures 5 & 6). See below....
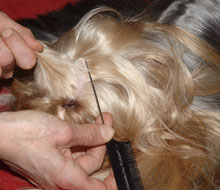
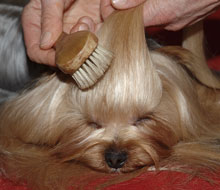
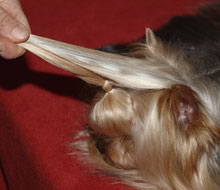
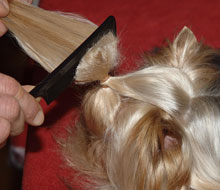
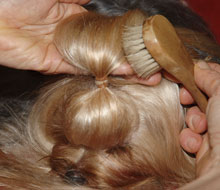
I start to backcomb the hair with a fine-tooth small comb and I divide it into 2 or 3 layers. The backcombing will be more or less strong depending on the effect I want to obtain (Pictures 7 & 8). I then use a soft brush that does not undo the backcombing and allows me to obtain a sleek effect (Picture 9). See below...
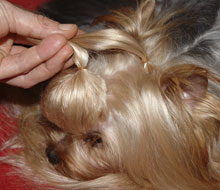
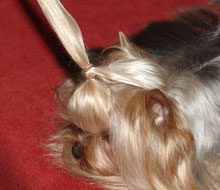
Once I have modeled the top knot as I like it, I secure it with another elastic paying attention that there is a very round and soft pleat (Picture 10). Then I fix the two knots with another elastic pushing forward the tuft of hair that keeps the ears (Pictures 11, 12) See below...
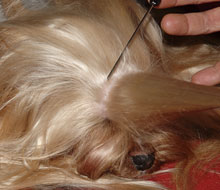
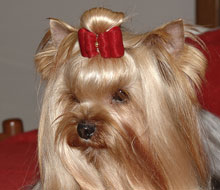
I gather another tuft of hair below the basis of the ears and bring it forward fixing it with another elastic, so that the elastic that keeps the ears cannot be seen (Pictures 13 & 14). A little more backcombing to obtain a lovely "ban" finishing touch (Pictures 15 & 16). See below...
The top knot is done! A red bow completes the work and makes our yorkie really charming (Pictures 17 & 18).
See below...
When brushing or combing, be gentle and take your time. Be especially careful when removing mats or tangles. Brushing can and should be a pleasant experience for your pet as the gentle stroking feels good on your pet's skin. It does not take too many painful 'rips' through snarls, however, to make brushing a procedure your pet will try to avoid rather than invite. The best way to build trust and make this a pleasurable bonding time for both of you is to brush your pet often, preferably daily. This prevents problem mats and tangles from developing.
Brush types: Although there are many different shapes and sizes, there are basically three different brush types.
Bristle Brushes: Bristle brushes can be used on all coat types and vary according to the spacing between bristles and the length of the bristles. In general, the longer the hair coat, the more widely spaced and longer the bristles should be. Also, the coarser the hair, the stiffer those bristles need to be.
Wire-Pin Brushes: Wire-pin brushes, with or without rubber-tipped ends, are the preferred choice for pets with medium to long hair and those with curly or woolly coats.
Slicker Brushes: Slicker brushes have fine wire bristles and are especially useful for removing mats and tangles.
Combs: Rubber curry combs are effective at massaging the skin and removing dead hair from short-haired breeds. It is also a good idea to have a Grooming Rake or Mat breaker on hand to remove mats.
Trimming your dog's nails is not just a part of grooming, but is important for your dog's health as well. Untrimmed nails can cause a variety of problems including broken nails that are painful and bleed profusely. In some cases, nails will actually curl and grow back into the dog's feet.
A good indication that dogs' nails are too long is a telltale 'click-click-click' when walking on uncarpeted areas.
How many of us put off trimming our dog's nails until the inevitable veterinary check-up comes around and the veterinarian must do it? If you are like many pet owners, you may be hesitant to trim your dog's nails because you are afraid of cutting the quick of the nail, which may cause pain or bleeding. Once you learn how to do it, clipping your dog's nails is almost as easy as clipping your own.
When you are trimming your dog's nails, you are only cutting away the excess. Recognizing what is excess and where the nerves and blood vessels begin is what you need to know to make nail trimming a painless process for both you and your dog.
To trim your dog's nails:
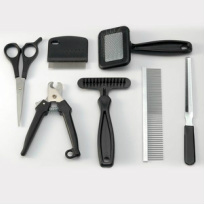
- Assemble what you will need - a high quality pair of trimmers and some styptic powder, such as Kwik-Stop, CutStop Styptic Pads, or other product to stop bleeding if you nick the quick. If you nick the mail and do not have these products on hand some flour or baking soda will work in a pinch.
- You may want to sit on the floor with your dog, hold your dog in your lap, or have someone hold your dog on a table. Hold your dog's paw firmly and push on his pads to extend the nail. Locate where the quick ends. With clear or light nails, it is easy to see the pink color where the quick ends.
- Using a nail trimmer for dogs, cut the nail below the quick on a 45-degree angle, with the cutting end of the nail clipper toward the end of the nail. You will be cutting off the finer point. In dogs, especially those with dark nails, make several small nips with the clippers instead of one larger one. Trim very thin slices off the end of the nail until you see a black dot appear towards the center of the nail when you look at it head on. This is the start of the quick that you want to avoid. The good news is that, the more diligent you are about trimming, the more the quick will regress into the nail, allowing you to cut shorter each time.
- In some cases, if the nails are brittle, the cut may tend to splinter the nail. In these cases, file the nail in a sweeping motion starting from the back of the nail and following the curve to the tip. Several strokes will remove any burrs and leave the nail smooth.
- If your dog will tolerate it, do all four feet this way. If he will not, take a break. And do not forget the dewclaws. On most breeds, if they have not been removed, dewclaws are 1-4" above the feet on the inner side of the legs. If not trimmed, dewclaws can grow so long they curl up and grow into the soft tissue, like a painful ingrown toe nail.
- If you accidentally cut the quick, wipe off the blood and apply Kwik-Stop or styptic powder to stop the bleeding. It is not serious and will heal in a very short time.
- Remember, it is better to trim a small amount on a regular basis than to try and remove large portions. Try to trim your dog's nails weekly, even if long walks keep them naturally short. The 'quick,' a blood vessel that runs down the middle of your dog's nail, grows as the nail grows, so if you wait a long time between cuttings, the quick will be closer to the end of the nail. This means more likelihood of bleeding during trimming.
- Trim nails so that when the dog steps down, nails do not touch the floor.
- Invest in a good pair of nail trimmers in an appropriate size for your dog. They can last a lifetime.
- Make trimming time fun and not a struggle. Trimming your dog's nails does not have to be a chore or unpleasant. If your dog is not used to having his nails trimmed, start slowly and gradually work up to simply holding his toes firmly for 15-30 seconds. Do not let him mouth or bite at you. It can take daily handling for a week or more to get some dogs used to this. When your dog tolerates having his feet held, clip just one nail, and if he is good, praise him and give him a tiny treat. Wait, and then at another time, do another nail. Continue until all nails have been trimmed. Slowly, you will be able to cut several nails in one sitting, and finally all the nails in one session.
Trimming your Yorkie’s hair at home
It is also a good idea to keep the area under your Yorkie’s tail trimmed. Long hair in this area tends to get rather icky pretty quickly. How you trim up this part of your Yorkie is up to you and your comfort zone. A lot of people leave this to the groomer. Some people use an electric trimmer or scissors.
7) As far as trimming the hair over the body of your Yorkie, I recommend taking your baby to a professional groomer. If you want to trim your Yorkie’s hair yourself and you feel comfortable, go for it. But, for most pet owners, it is easier to take their Yorkie to the groomer once every month or two as opposed to the stress of clipping the hair themselves. If you decide to trim yourself, there are some great ideas below. You can use scissors or trimmers or a combination. If you use trimmers - remember to always cut with the growth of the hair, not against, or you will have a bald baby on your hands.
As far as when to do which part of the grooming, here is a break-down for you:
Daily:
Brush Hair
Brush Teeth
Weekly:
Bath
Bi-Monthly:
Trim nails
Monthly:
Clean Ears
Trim Ear Hair and Trouble Areas
Every 2 Months, or as needed:
Haircut / Visit the Groomer
Yearly:
Veterinarian Teeth Cleaning
Yorkies need special attention paid to their teeth. Yorkies, like other toy breeds, are prone to tooth decay. Regular brushing of your Yorkie’s teeth is a good idea. There are many tooth cleaning products made for dogs, and you can find a tooth brush &paste at any pet supply store
Preparation of the TopKnot
By Nicoletta Pollini (Italy) Breeder: Qoccle's Yorkshire Terrier.
This article is published in Yorkie Club Magazine. Permission of publication granted by YCM. Images are copyright of YCM.
When I prepare the TopKnot, I start gathering two small tufts of hair at the internal base of the ears and tie them up with two small elastics, paying attention the ears do not remain in an unnatural position, that is too close to each other (Pictures 1 & 2). See below....
Now I divide a part of hair at the top of the head creating a round shape (Pictures 3 & 4). I let the remaining hair (between the ears and the top knot) fall down at the sides of the head, so that the yorkie's head looks the sweetest possible (Pictures 5 & 6). See below....
I start to backcomb the hair with a fine-tooth small comb and I divide it into 2 or 3 layers. The backcombing will be more or less strong depending on the effect I want to obtain (Pictures 7 & 8). I then use a soft brush that does not undo the backcombing and allows me to obtain a sleek effect (Picture 9). See below...
Once I have modeled the top knot as I like it, I secure it with another elastic paying attention that there is a very round and soft pleat (Picture 10). Then I fix the two knots with another elastic pushing forward the tuft of hair that keeps the ears (Pictures 11, 12) See below...
I gather another tuft of hair below the basis of the ears and bring it forward fixing it with another elastic, so that the elastic that keeps the ears cannot be seen (Pictures 13 & 14). A little more backcombing to obtain a lovely "ban" finishing touch (Pictures 15 & 16). See below...
The top knot is done! A red bow completes the work and makes our yorkie really charming (Pictures 17 & 18).
See below...